
There are a lot of things that Apple gets right, but pricing is not one of them. This is a company that’s made a fortune by defying conventional wisdom, so it’s hard not to admire it and its products despite their occasional quirks and shortcomings. Apple’s appeal has grown from a long history of understanding what users are really doing with their computers and devices, and knowing how to create things that people will desire. It’s all about the experience— their goal is to make you feel delight and wonderment from the time you walk into a shop till you take your new device out of its box and switch it on for the fi rst time. Everything that Apple does, from the iron-clad secrecy it maintains around upcoming products to the theatricality of its unveilings, is designed to further that experience. Once the association with joy has been made in buyers’ minds, they’re hooked. Mac OS X has a lot of appeal: the graphics are rich, security is higher than Windows, it’s generally easier for beginners to get used to, and there’s some excellent software available for creative professionals. For most people though, just the “coolness” factor and thrill of getting it working without spending money on Apple hardware are reason enough to try. This is the “reality distortion fi eld”
effect that dozens of other companies have tried to emulate over the years, to varying degrees of success. Just like
everyone else, Apple has had to adapt to a changing world, one in which everything is mass produced in China, there are only two or three manufacturers of each kind of high-end component, and it costs too much to try and do things on your own. Today, it’s possible to take a small chunk of that Apple experience and use it on your own, outside the confi nes of the expensive ecosystem built specifi cally for it. The enjoyment won’t be the same, but the whole point is to expand users’ options and give them the choice. We’re referring, of course, to running Mac OS X on any ordinary PC, something that the Cupertino giant does not like, endorse or acknowledge in any way. Apple’s desktop OS is fi nely tuned to work with its own hardware, software and online services: an entire ecosystem. This has the disadvantage of limiting your choices (and budget range) when it comes to buying a new computer, but it has the advantage of eliminating the thousands of variables that tend to make Windows machines slow or unstable. Apple has never expressly allowed other brands to sell machines with OS X preinstalled, so you’ll never fi nd a Mac
bogged down with “bloatware” added on by third-party manufacturers, and you won’t have to go hunting for a printer
driver when you need one, because it’s already built in. Be warned, running OS X is a tricky proposition and it’s not endorsed by Apple in any way. You’ll be contravening their end-user license agreement and will not have access to any help or support from them. You also won’t have a Macspecifi c keyboard, mouse or trackpad, which will make several shortcuts and gestures impossible to use. This process is not recommended for casual users, or anyone who isn’t familiar with the internal workings of a PC. You run the risk of erasing your hard drive and losing whatever’s on it, so make sure you have backups. Moreover, obtaining a legal copy of Lion, the latest version of OS X, is entirely your responsibility.
The Hackintosh Process
Installing an operating system on hardware not originally designed for it is a tricky process. Apple is famous for building experiences around tightly integrated hardware and software, so problems are bound to crop up when trying to run OS X on unfamiliar components. It's not impossible to run OS X on commodity PC hardware, but this isn't a project to undertake if you're not 100 percent comfortable with your computer's inner workings. As of now, OS X Lion is a bit more diffi cult to get running than previous versions, Leopard and Snow Leopard. Methods of running these older versions have existed for years now, and a vibrant developer community online is constantly making new drivers available to extend compatibility with all kinds of hardware. With Lion only recently released, the driver database is understandably small, and it's quite likely that you'll run into compatibility issu4es and other odd problems. The most frustrating issue we faced was with an incompatible USB keyboard, which caused all sorts of input errors! Before beginning any experiment, we must emphasize the importance of backing up everything on your computer. Make a list of all hardware and drivers and search online for known
problems. Then, if you're sure you understand all the risks and liabilities, you're ready to proceed.
REQUIREMENTS

Kakewalk: Freely downloadable from
www.kakewalk.se, this is a simple yet
powerful utility which is nothing but a set
of scripts running in the background.

Lion installer: The operating system (Mac OSX
Lion v10.7) can be downloaded for as little as USD
29.99 (approx Rs 1,400) from the Mac App Store
(Mac required). Download this 3.5 GB DMG file.

Minimum 8 GB USB stick: This USB
stick will be formatted and loaded with the
bootloader and the Lion installation files.

A Macintosh: A Mac is needed to create the USB
stick with the necessary fi les for installing Lion on a
PC. If you don’t own one, you'll have borrow one for
at least an hour after the installer is downloaded.
You won't be able to download Lion from the
Mac App Store if this Mac is already running it.

MultiBeast and KextBeast: These free utilities
can be found atwww.tonymacx86.blogspot.com.
They are needed to install basic drivers for the PC.

Once you have downloaded Lion
and have all the fi les ready, you
can start the process.
STEP 1
Copy the Lion installation fi le (InstallESD.
dmg) and Kakewalk to the desktop of the
Macintosh. Run the Kakewalk utility, and
on the main screen, click on ‘Install to a

STEP
sTEP 2
On the next screen, select the location
of the Lion DMG fi le and choose the USB
stick as the destination. Make sure you
choose the correct destination (the USB
stick), or you'll end up installing it to the
Mac you're working on. When you're sure,
click the ‘Create’ button.

STEP 3
The Kakewalk utility will do the necessary
work in the background. It involves
formatting the USB stick, mounting the
Lion DMG image, copying the installer
fi les and packages to the USB stick
and a lot more. All this is done in the
background and may take a while
depending on the speed of the pen drive.
Your USB stick will also be renamed to
‘Kakewalk’.

STEP 4
After the process is complete, the
utility will ask you to start the Kakewalk
installation. Click OK to continue and
the next screen will ask you to choose
your motherboard model number. The
exact version is preferable, but a close
variant will also do. Make sure you have
an Internet connection as Kakewalk will
need to download the necessary drivers
from its repository. If your motherboard
is not listed, you'll have to choose the
closest match. Then carefully select
your destination as the USB drive (now
renamed as Kakewalk). Click on ‘Start
Installation’. After completion, you can
safely eject the USB stick and return the
Macintosh to its owner, unscathed.
STEP 6
When you boot from the USB stick,
you will be greeted by Kakewalk's
EFI bootloader. Select the USB stick
(Kakewalk) on your screen and press
[Enter].
WARNING: The target hard drive will be
reformatted and all data on it will be lost.
If possible, install Lion on a new, blank
hard drive.
STEP

STEP 5
Now plug the USB stick into your PC and
turn it on. Go to the BIOS where a few
changes need to be made. Change the
boot priority to USB HDD. Next, make
sure you make the following changes if
you have the options in your BIOS: HPET:
Enable (64-bit), ACPI Suspend type: S3
(STR) and Hard drive: AHCI enabled. Save
and close the BIOS settings. Restart the
PC and boot from the USB stick.

STEP 6
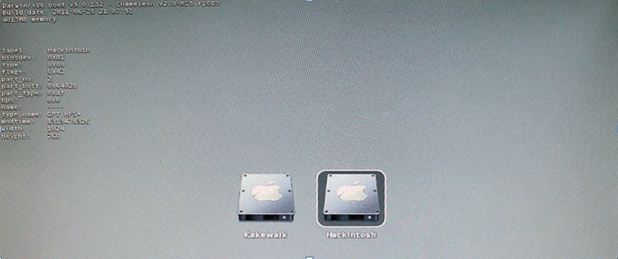
When you boot from the USB stick,
you will be greeted by Kakewalk's
EFI bootloader. Select the USB stick
(Kakewalk) on your screen and press
[Enter].
WARNING: The target hard drive will be
reformatted and all data on it will be lost.
If possible, install Lion on a new, blank
hard drive.

STEP 7
After a long process during which you'll
see lines of text characters scrolling
continuously, you will land at the
Lion installation screen. If you have
not reached here, it's possible that a
compatibility issue has been discovered.
Note the error lines displayed on screen
and search the Internet for a specifi c
solution. You should fi nd specifi c help
on the various forums dedicated to OS X
fans. For example, the error ‘DSMOS has
arrived’ means that the video card is not
compatible.

STEP 8
Follow the steps shown on screen till you
arrive at the screen which asks you to
choose the destination disk to install the
OS to. At this screen, click on ‘Utilities’
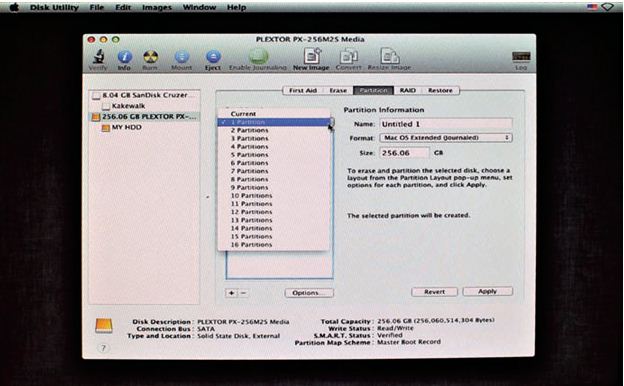
and then ‘Disk Utility’. This will start the
partition manager for Mac OS X.
STEP 9
Using Disk Utility, click on your target
hard drive in the left pane and then click
on ‘Partition’ on the right pane. From the
Volume Scheme, select ‘1 Partition’ and in
the ‘Options’ below, select ‘GUID Partition
Table’. Then in the Volume Information,
type a name for the partition, select
the format type as ‘Mac OS Extended
(Journaled) and leave the rest untouched.
Finally, click on ‘Apply’ and proceed to
format the drive. Once done, exit Disk
Utility and proceed with the installation of
the OS. The installation will take around
30 minutes, at the end of which your
computer will reboot. Leave the USB stick
plugged in, as there is no bootloader yet.
INTELLIGENT COMPUTING CHIP 09/2011 93
STEP 10
This time, when the system boots again,
choose to boot from the hard drive
instead of the USB stick. Once booted,
you should be welcomed to the next
steps of the installation. Continue with all
the necessary details that are asked on
the screen.

STEP 11
Once done, you should arrive at the
default Lion desktop. Congratulations,
your installation has been successful! But
you have still got to install the bootloader
to your hard drive so that it can boot up
on its own.

STEP 12
Locate your USB stick in the OS X Finder
and open it. You will fi nd the application
‘Kakewalk’—double-click and run the
utility. Click on the icon that reads ‘Install
to Computer’.

STEP 13
This screen will highlight the
motherboard model you chose while
making the USB stick on the Macintosh.
You cannot change anything here, so
simply click on ‘Start Installation’. After a
few minutes, you will be asked to reboot
the machine. Now your bootloader is
installed on your system and you can
safely boot your PC from the hard drive.
Mac OS X Lion is ready to go!

STEP 14
Installing drivers is the biggest headache,
but you can do it in a few steps. First,
using MultiBeast, you can install basic
drivers for audio, network, graphics, and
system components. Copy the Multibeast
utility to your new desktop and run
it. Follow the steps till you reach the
‘Installation Type’ screen. From the drop
down list, carefully choose the drivers of
your motherboard and graphics card by
referring to their respective user manuals.
If you are not sure of any of the drivers,
simply don’t select it, or else you will
cause errors known as Kernel panic, and
might need to reinstall Lion all over again.
When the process is complete, you'll
need to reboot the PC.

STEP 15
Additional drivers that are not available <
through Multibeast can be downloaded
and installed separately using the
KextBeast utility. The drivers are usually
in the form of .KEXT fi les and need to
be inserted into certain folders and their
permissions set to a particular level.
KextBeast does it for you automatically.
All you need to do is copy the KEXT fi les
and the KextBeast utility to the desktop
and run the utility. It will automatically
search for the drivers on the desktop and
install them. 


